
Table of Contents
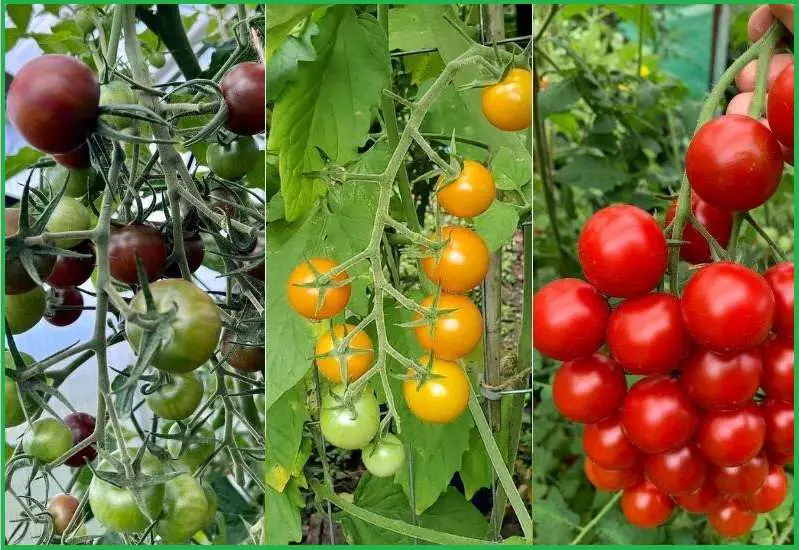
Fresh, flavorful, and fabulous – the trifecta of cherry tomatoes!
Imagine plucking a juicy, sun-warmed cherry tomato right from the vine, popping it into your mouth, and savoring its burst of sweet and tangy goodness. This sensory delight is one reason why cherry tomatoes have soared in popularity among home gardeners. But there’s more to it than just taste; their petite size and adaptability make them a darling choice for gardeners with limited space.
Throughout this article, we’ll equip you with the knowledge and tips needed to embark on your cherry tomato container gardening journey. So, roll up your sleeves, and let’s get those green thumbs working!
Benefits of Growing Cherry Tomatoes in Containers
In this article, we’re diving deep into the art of Growing Cherry Tomatoes right in the cozy confines of containers. Let’s explore 05 compelling benefits that have gardeners across the globe turning to containers for their cherry tomato fix:
- Space-Savvy: Not everyone has a sprawling garden, but that’s no excuse to skip out on homegrown tomatoes. Containers let you cultivate cherry tomatoes on a balcony, patio, or even a sunny windowsill.
- Year-Round Enjoyment: Container gardening allows you to control your cherry tomato’s environment. With the right setup, you can extend your growing season, ensuring a year-round supply of these delightful fruits.
- Less Pest Trouble: Pests and diseases can be a headache in the garden. By growing in containers, you have more control over your cherry tomato’s surroundings, reducing the risk of unwanted visitors.
- Easier Maintenance: Containers simplify gardening tasks. You can position them at an ideal height, reducing the strain on your back. Plus, they make tasks like weeding and pruning more manageable.
- Garden Aesthetics: Cherry tomato plants, with their vibrant foliage and plump fruits, are aesthetically pleasing. Containers allow you to create an edible garden that doubles as a visual delight.
Selecting the Right Container for Cherry Tomatoes
Types of Containers for Cherry Tomatoes
When it comes to cherry tomatoes, there’s no one-size-fits-all container. Here are some container options to consider:
- Pots: These classic containers come in various sizes and materials like clay, ceramic, or plastic. They’re versatile and suitable for small spaces.
- Grow Bags: Lightweight and affordable, grow bags offer excellent drainage. They’re ideal for temporary or portable gardens.
- Self-Watering Containers: These modern marvels come equipped with a built-in reservoir, ensuring consistent moisture for your tomatoes.
- Hanging Baskets: Perfect for vertical gardening, hanging baskets save space and add a decorative touch to your garden.
- Troughs: Long and narrow, troughs are excellent for growing a row of cherry tomatoes. They’re suitable for creating a garden border.
- Recycled Containers: Get creative! Old barrels, wooden crates, or even five-gallon buckets can be upcycled into unique cherry tomato containers.
Considerations for Container Size and Material
Selecting the right container size and material is crucial for cherry tomato success. Here are six key considerations:
- Tomato Variety: Different cherry tomato varieties have varying space requirements. Choose a container size that accommodates your chosen variety’s growth habits.
- Root Depth: Cherry tomato roots can run deep. Ensure your container is deep enough to accommodate their root system.
- Material Durability: Consider your climate. Terracotta pots may crack in freezing temperatures, while plastic containers might deteriorate in intense sunlight.
- Weight and Mobility: Large containers can be heavy. If you need to move them around, consider adding casters to make your life easier.
- Number of Plants: Decide how many cherry tomato plants you want to grow in each container. Crowding can lead to competition for resources.
- Aesthetics: While functionality is key, don’t forget the visual appeal. Choose containers that enhance your garden’s overall look.
Drainage and Aeration Requirements
Proper drainage and aeration are essential for healthy cherry tomatoes. Here’s what you need to know:
- Drainage: To prevent waterlogged roots and root rot, ensure your container has drainage holes at the bottom.
- Aeration: Adequate aeration is crucial for healthy root development. Use a well-draining potting mix to promote oxygen flow to the roots.
- Elevate Containers: Place containers on pot feet or bricks to allow air circulation beneath the container.
- Mulching: Add a layer of mulch on top of the soil to regulate soil temperature, reduce moisture evaporation, and discourage weeds.
- Regular Inspection: Check for clogs in drainage holes and adjust watering to maintain proper moisture levels.
By carefully considering the type, size, and material of your containers and ensuring proper drainage and aeration, you’re laying the foundation for a thriving cherry tomato container garden. Ready to take the next step? Let’s delve into selecting the perfect cherry tomato variety in the next section!
Choosing the Right Cherry Tomato Varieties
Cherry Tomato Varieties Ideal for Container Gardening
Before you dive into the world of cherry tomato varieties, it’s crucial to know which ones are ideal for container gardening. Here’s a list of cherry tomato varieties that thrive in containers:
- Tiny Tim: As the name suggests, these are compact and perfect for small spaces.
- Balcony: Designed for container gardening, these cherry tomatoes produce bountiful fruit in confined spaces.
- Patio Princess: Small, determinate plants that fit comfortably on a patio or balcony.
- Tumbling Tom: A hanging basket favorite, these cherry tomatoes cascade beautifully over the edges.
- Bush Early Girl: Compact and early-producing, ideal for those with limited space and patience.
- Lizzano: A trailing cherry tomato variety, perfect for hanging baskets or containers with support.
Factors to Consider When Selecting the Right Variety
Choosing the right cherry tomato variety can make or break your container gardening experience. Here are six factors to consider:
- Space Available: Assess the space you have for your container garden. Compact varieties are a must for smaller spaces.
- Sunlight: Take note of the amount of sunlight your chosen location receives. Some varieties are more sun-loving than others.
- Growth Habit: Determinate varieties are more compact and manageable, while indeterminate ones can get tall and vine-like.
- Climate: Consider your local climate. Some varieties are more heat-tolerant, while others can withstand cooler temperatures.
- Flavor Preference: Cherry tomatoes come in a range of flavors, from super-sweet to mildly tangy. Pick one that suits your taste buds.
- Container Size: Ensure the variety you choose is compatible with the size of your container. You don’t want overcrowding.
Availability of Hybrid and Heirloom Cherry Tomato Seeds
| VARIETY | TYPE | DESCRIPTION |
|---|---|---|
| Sweet 100 | Hybrid | Classic red cherry tomatoes, prolific and sweet. |
| Sun Gold | Hybrid | Bright orange, incredibly sweet, and tangy. |
| Black Cherry | Heirloom | Dark purple, rich and complex flavor. |
| Super Sweet 100 | Hybrid | Improved version of Sweet 100, disease-resistant. |
| Yellow Pear | Heirloom | Tiny pear-shaped, sweet and mild flavor. |
| Tiny Tim | Heirloom | Dwarf plant, small red tomatoes, perfect for containers. |
| Tumbling Tom | Hybrid | Trailing variety, great for hanging baskets. |
| Balcony | Heirloom | Compact and productive, ideal for balconies and small spaces. |
| Patio Princess | Hybrid | Small determinate plant, perfect for patios and decks. |
| Lizzano | Hybrid | Trailing cherry tomatoes, suitable for hanging containers. |
Note: Availability may vary depending on your location and seed supplier.
With this diverse selection of cherry tomato varieties and the factors to consider when choosing the right one, you’re ready to embark on a flavorful and fruitful container gardening adventure.
Soil and Potting Mix
Importance of Well-Draining Soil
Before we delve into the potting mix, let’s talk about why well-draining soil is essential for cherry tomatoes:
- Root Health: Well-draining soil prevents water from pooling around the roots, reducing the risk of root rot and other moisture-related issues.
- Nutrient Absorption: It allows better absorption of essential nutrients by the roots, promoting healthier growth.
- Oxygen Flow: Good drainage ensures that oxygen reaches the root zone, facilitating vital metabolic processes.
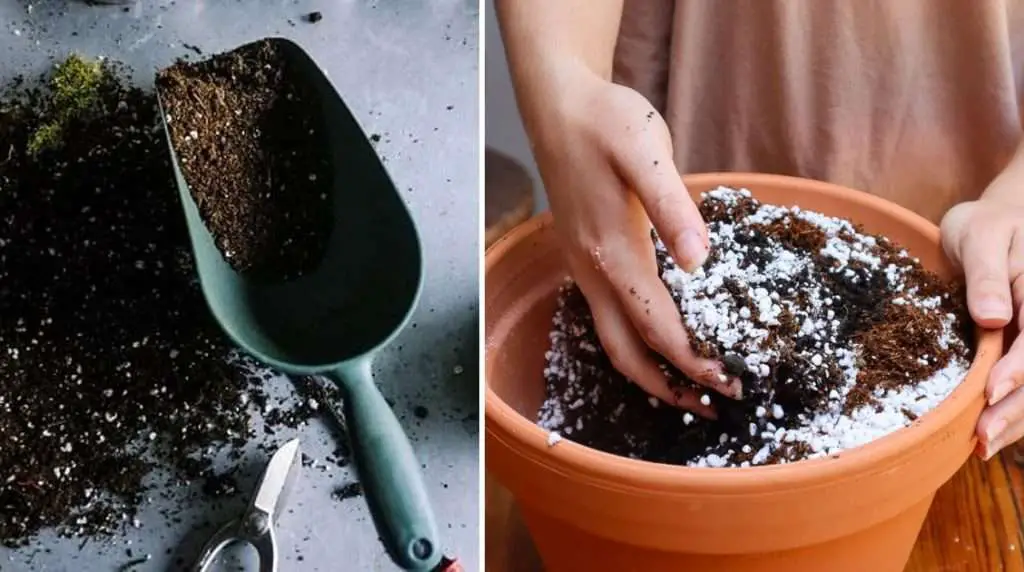
Preparing the Potting Mix for Cherry Tomatoes
Creating the perfect potting mix is an art. Here’s how to do it:
- Ingredients: Start with a high-quality potting mix, or make your own by blending equal parts garden soil, compost, and peat moss or coconut coir.
- Add Perlite: Mix in perlite or vermiculite to improve aeration and drainage. Aim for a 1:1 ratio with your potting mix.
- Fertilizer: Incorporate slow-release balanced fertilizer or organic compost to provide essential nutrients.
- Soil Test: Consider a soil test to determine pH levels and nutrient deficiencies.
Soil pH and Nutrient Requirements
- pH Level: Aim for a slightly acidic to neutral pH level between 6.0 and 6.8. This range ensures optimal nutrient availability to your cherry tomato plants.
- Nitrogen (N): Cherry tomatoes thrive on nitrogen. Choose a fertilizer with higher nitrogen content for healthy foliage.
- Phosphorus (P): Essential for flower and fruit production, ensure a balanced supply of phosphorus.
- Potassium (K): Promotes overall plant health and disease resistance.
Planting Cherry Tomato Seeds
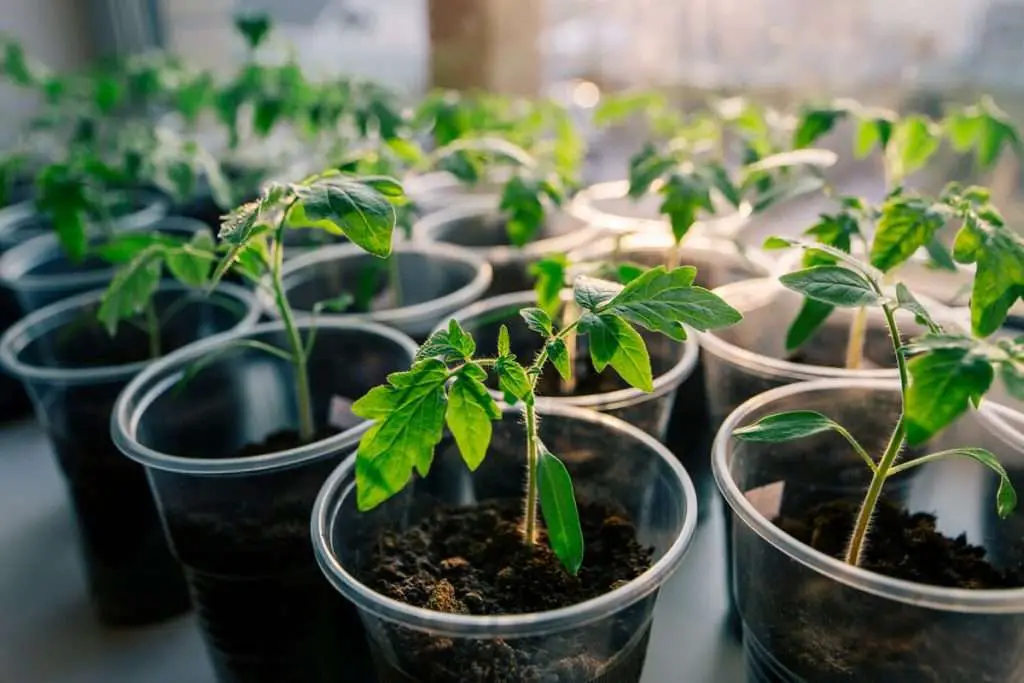
Step-by-Step Guide to Planting Cherry Tomato Seeds
Let’s get those cherry tomato seeds in the ground:
- Container Selection: Choose a clean, well-draining container with drainage holes.
- Fill with Potting Mix: Fill the container with your prepared potting mix, leaving about an inch from the top.
- Plant the Seeds: Plant cherry tomato seeds about a quarter-inch deep in the center of the container. Space them 2-3 inches apart.
- Cover and Water: Gently cover the seeds with potting mix, water thoroughly but not excessively, and cover the container with a plastic lid or plastic wrap to create a mini-greenhouse effect.
- Germination: Place the container in a warm, sunny spot or use a heat mat to maintain a soil temperature of around 75-80°F (24-27°C). Seeds typically germinate in 5-10 days.
Optimal Planting Depth and Spacing
- Planting Depth: Plant your cherry tomato seeds about 1/4 inch deep. This provides them with the right balance of warmth and moisture for germination.
- Spacing: When planting multiple seeds in a single container, space them 2-3 inches apart to prevent overcrowding as they grow.
Watering and Initial Care after Planting
- Watering: Keep the soil consistently moist, not soggy. Use a gentle spray or a watering can with a fine nozzle to avoid disturbing the seeds.
- Maintain Humidity: Until the seedlings emerge, maintain high humidity by keeping the container covered. Once they sprout, gradually remove the cover to acclimate them to lower humidity.
With your cherry tomato seeds sown and on their way to sprouting, it won’t be long before you’re tending to your thriving tomato seedlings. Stay tuned for our next section on container placement and sunlight requirements to ensure your cherry tomatoes get all the sunshine they need!
Container Placement and Sunlight
Determining the Best Location for Your Cherry Tomato Container
Choosing the right spot for your cherry tomato container can significantly impact your harvest:
- Space: Opt for a location with sufficient space for your container, allowing at least 2 feet of clearance on all sides for air circulation and ease of maintenance.
- Accessibility: Ensure your container is easily accessible for watering, pruning, and harvesting.
Sunlight Requirements for Cherry Tomatoes
Cherry tomatoes are sun-worshippers! Here’s what they need:
- Full Sun: They thrive in full sun, which means at least 6-8 hours of direct sunlight daily.
- Partial Shade: In scorching climates, a little afternoon shade can help prevent sunscald on the fruits.
Managing Sunlight Exposure in Different Climates
- Hot Climates: In areas with intense heat, provide afternoon shade or use shade cloth to protect your plants from scorching.
- Cool Climates: In cooler regions, use reflective surfaces like white walls or containers to maximize available sunlight and trap heat.
Watering and Fertilizing
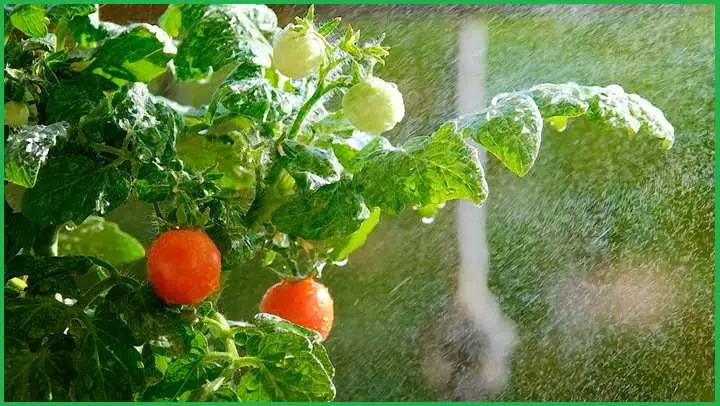
Watering Needs for Container-Grown Cherry Tomatoes
Watering is the lifeline of your cherry tomatoes:
- Consistency: Keep the soil consistently moist, but not waterlogged. Uneven watering can lead to issues like blossom end rot.
- Deep Watering: Water deeply to encourage the roots to grow deeper, making the plant more resilient to dry spells.
7 Tips for Maintaining Consistent Moisture Levels
- Mulch: Apply a layer of mulch on top of the soil to retain moisture and regulate temperature.
- Use a Saucer: Place a saucer under the container to catch excess water, allowing the plant to absorb it when needed.
- Drip Irrigation: Consider drip irrigation systems for consistent, controlled watering.
- Self-Watering Containers: Invest in self-watering containers for automated moisture management.
- Water in the Morning: Watering in the morning allows excess moisture to evaporate during the day, reducing the risk of fungal diseases.
- Avoid Wet Foliage: Water the base of the plant, not the foliage, to prevent fungal issues.
- Check Soil Moisture: Stick your finger into the soil up to the first knuckle. If it feels dry, it’s time to water.
Fertilizing Schedules and Methods for Cherry Tomatoes
- Early Feeding: Start with a balanced, slow-release fertilizer or compost when planting. This provides essential nutrients for initial growth.
- Regular Feeding: Fertilize every 2-4 weeks during the growing season. Choose a fertilizer with higher nitrogen content for vigorous foliage growth.
- Avoid Over-Fertilizing: Too much fertilizer can lead to excessive foliage growth at the expense of fruit production. Follow package instructions carefully.
Can You Recommend a Good Fertilizer?
Certainly! A well-balanced, all-purpose fertilizer like a 10-10-10 or 14-14-14 NPK ratio fertilizer can work wonders for cherry tomatoes. Brands like Miracle-Gro, Jobe’s, or Espoma offer quality options. Always choose a fertilizer specifically designed for vegetables or tomatoes to ensure your plants get the right nutrients.
With your cherry tomato container garden basking in the sun and receiving the nourishment it needs, it won’t be long before you start seeing those little green tomatoes making their appearance.
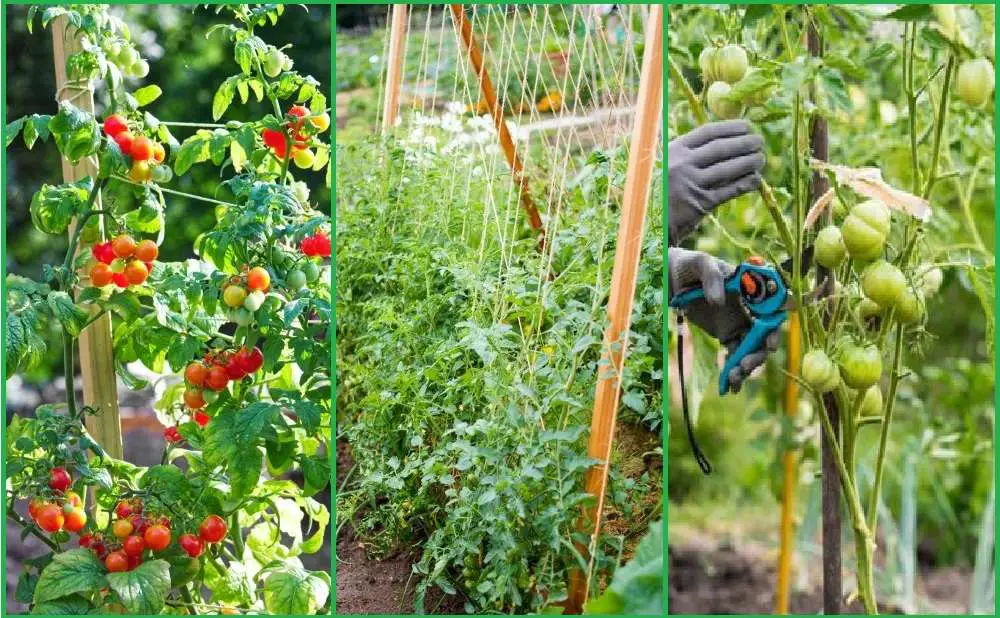
Pruning and Support
Importance of Pruning for Cherry Tomato Plants
Pruning might seem like a daunting task, but it’s crucial for cherry tomato plants:
- Airflow: Pruning improves airflow between branches, reducing the risk of fungal diseases.
- Fruit Production: Removing excess foliage directs the plant’s energy into producing more fruit.
- Size Control: It keeps the plant’s size manageable for your container, preventing overcrowding.
- Sunlight Penetration: Pruning allows sunlight to reach all parts of the plant, ensuring even ripening of fruits.
- Disease Prevention: Regular pruning helps remove infected or yellowing leaves, reducing the spread of diseases.
Step-by-Step Guide to Pruning Cherry Tomatoes
Here’s a simplified guide to pruning cherry tomatoes:
- Identify Suckers: Suckers are small shoots that grow in the crotch between the main stem and branches. Identify them.
- Remove Suckers: Gently pinch off suckers when they’re small. Use your fingers or sharp pruning shears.
- Focus on Main Stem: Maintain one or two main stems, especially for determinate varieties. Remove any additional stems.
- Remove Excess Foliage: Prune away any excess foliage, especially from the lower parts of the plant.
- Continue Pruning: Regularly inspect your plant for new suckers and continue the pruning process throughout the growing season.
Supporting Cherry Tomato Plants in Containers
Supporting your cherry tomato plants prevents them from toppling over and helps maximize fruit production:
- Staking: Insert stakes near the base of the plant and gently tie the main stem to the stake as it grows.
- Caging: Place a tomato cage around the plant to provide support as it grows taller.
- Trellising: For indeterminate varieties, use a trellis or twine to support the vine-like growth.
With proper pruning and support, your cherry tomato plants will stand tall and strong, ready to deliver a bumper crop of delicious fruits!
Pest and Disease Management
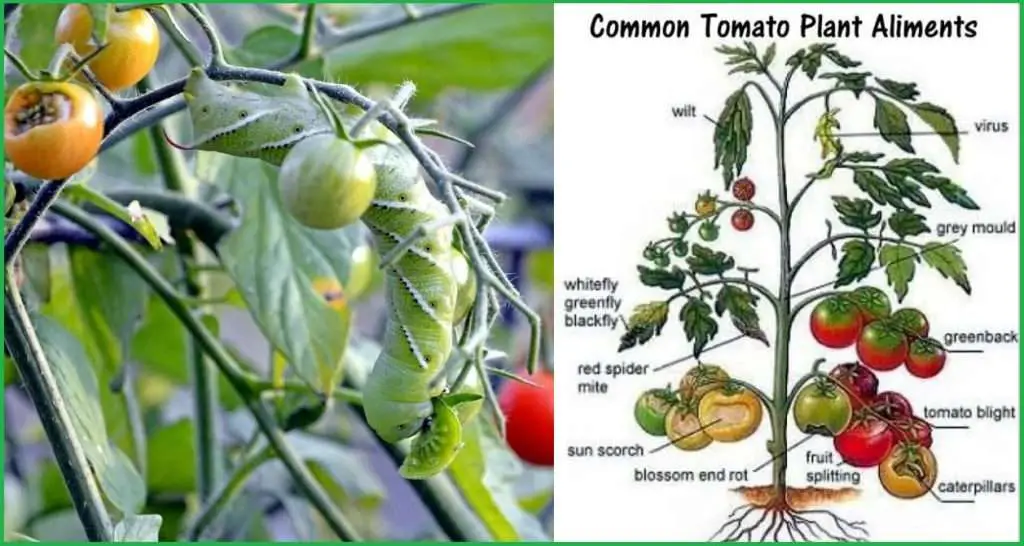
Common Pests and Diseases Affecting Cherry Tomatoes and Remedies
Here’s a comprehensive table of common pests and diseases affecting cherry tomatoes, along with remedies:
| PESTS | SYMPTOMS | REMEDIES |
|---|---|---|
| Aphids | Sticky residue on leaves, curling | – Blast with water or use insecticidal soap. – Release beneficial insects like ladybugs. |
| Hornworms | Large green caterpillars, defoliation | – Handpick and destroy. – Attract beneficial insects like parasitic wasps. |
| Whiteflies | Tiny white insects, yellowing leaves | – Use reflective mulch. – Spray with neem oil or insecticidal soap. |
| Spider Mites | Fine webbing, stippled leaves | – Spray with neem oil or a strong jet of water. – Increase humidity. |
| Fruit Flies | Tiny flies around fruits | – Set up traps with apple cider vinegar. – Keep garden clean. |
| Cutworms | Cut stems at soil level | – Collar the base of seedlings with cardboard. – Handpick at night. |
| Slugs and Snails | Irregular holes in leaves, slime trails | – Handpick and relocate. – Apply diatomaceous earth around plants. |
| Tomato Fruitworm | Holes in fruits, frass (droppings) | – Handpick and destroy larvae. – Use pheromone traps. |
| Leaf Miners | Trailing tunnels in leaves | – Prune affected leaves. – Use yellow sticky traps. |
| DISEASES | SYMPTOMS | REMEDIES |
|---|---|---|
| Early Blight | Dark spots with concentric rings on lower leaves | – Remove affected leaves. – Apply copper fungicides. |
| Late Blight | Dark, watery lesions on leaves and fruit | – Remove affected leaves and destroy. – Copper fungicides. |
| Blossom End Rot | Dark, sunken areas on fruit bottoms | – Maintain consistent moisture. – Add calcium-rich amendments. |
| Powdery Mildew | White powdery spots on leaves | – Prune affected leaves. – Apply neem oil or baking soda spray. |
| Septoria Leaf Spot | Small, circular spots with dark borders on leaves | – Remove infected leaves. – Apply copper-based fungicides. |
| Fusarium Wilt | Yellowing, wilting, and dying of lower leaves | – No cure; remove and destroy infected plants. – Plant resistant varieties. |
| Verticillium Wilt | Yellowing and wilting of lower leaves | – No cure; remove infected plants. – Plant resistant varieties. |
| Grey Mold (Botrytis) | Grey, fuzzy growth on fruit and leaves | – Remove affected plant parts. – Improve air circulation. |
Certainly, here are two tables: one for organic and chemical-free methods for pest control and another for disease control, categorized by the type of pest and disease.
Organic and Chemical-Free Methods for Pest Control and Disease Control
Here’s a table categorizing organic and chemical-free methods for pest control and disease control according to the type of pest and disease:
Pest Control
| TYPE OF PEST | ORGANIC AND CHEMICAL-FREE METHODS |
|---|---|
| Aphids | – Insecticidal soap. – Neem oil. – Ladybugs. |
| Hornworms | – Handpicking. – Beneficial wasps. – Companion planting. |
| Whiteflies | – Neem oil or insecticidal soap. – Reflective mulch. |
| Spider Mites | – Neem oil. – Water spray. – Predatory mites. |
| Fruit Flies | – Traps with apple cider vinegar. – Remove overripe fruit. – Keep garden clean. |
| Cutworms | – Collars around seedlings. – Handpicking at night. |
| Slugs and Snails | – Handpicking and relocation. – Diatomaceous earth. – Beer traps. |
| Tomato Fruitworm | – Handpicking larvae. – Pheromone traps. – Companion planting. |
| Leaf Miners | – Prune affected leaves. – Yellow sticky traps. – Beneficial insects. |
Disease Control
| TYPE OF DISEASE | ORGANIC AND CHEMICAL-FREE METHODS |
|---|---|
| Early Blight | – Remove affected leaves. – Copper fungicides. – Baking soda spray. |
| Late Blight | – Remove affected leaves and destroy. – Copper fungicides. – Baking soda spray. |
| Blossom End Rot | – Maintain consistent moisture. – Add calcium-rich amendments. |
| Powdery Mildew | – Prune affected leaves. – Neem oil. – Baking soda spray. |
| Septoria Leaf Spot | – Remove infected leaves. – Copper-based fungicides. – Proper plant spacing. |
| Fusarium Wilt | – Remove and destroy infected plants. – Plant resistant varieties. – Soil solarization. |
| Verticillium Wilt | – Remove and destroy infected plants. – Plant resistant varieties. – Crop rotation. |
| Grey Mold (Botrytis) | – Remove affected parts. – Improve air circulation. – Neem oil. |
These methods provide effective and chemical-free ways to manage both pests and diseases in your cherry tomato garden, allowing you to cultivate healthy and tasty tomatoes naturally.
Harvesting Cherry Tomatoes
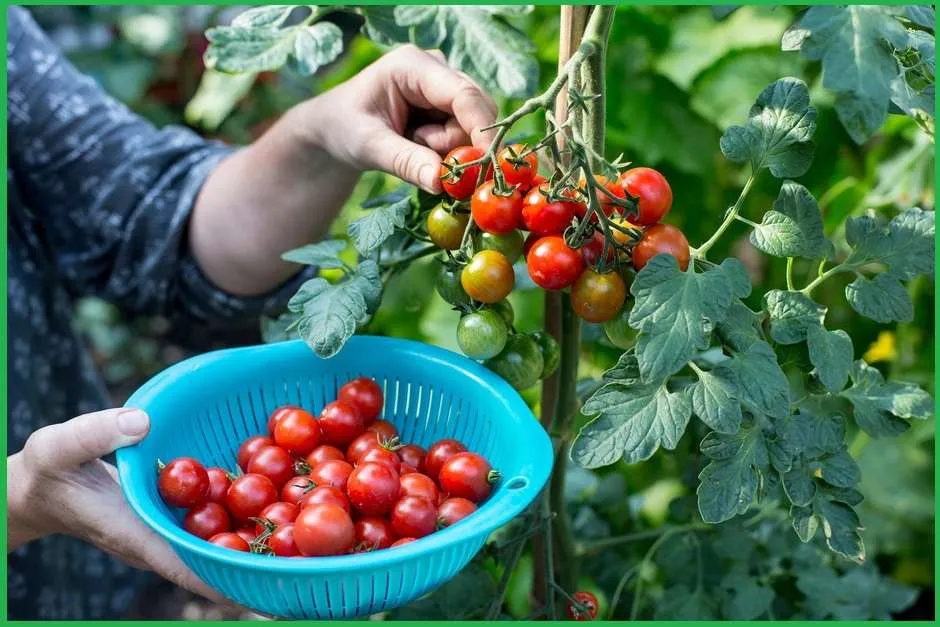
Signs of Ripe Cherry Tomatoes
Knowing when to harvest is key to enjoying the sweetest cherry tomatoes:
- Color: They should have vibrant, even color, depending on the variety (red, orange, yellow, or even purple).
- Texture: They should be firm yet yield slightly to gentle pressure, without being too soft.
- Glossiness: Ripe cherry tomatoes often have a glossy appearance.
- Aroma: They should have a fragrant, tomatoey smell.
- Easy Separation: They should come off the vine with a gentle twist or tug.
- Taste Test: Of course, taste one! It should be sweet, juicy, and bursting with flavor.
Harvesting Techniques for Cherry Tomatoes
Harvesting cherry tomatoes is a delicate process. Here are seven techniques:
- Hand-Picking: Gently grasp the tomato and twist it until it separates from the vine.
- Scissors or Pruners: Use clean, sharp scissors or pruning shears to snip the stem just above the fruit.
- Bucket Method: Hold a bucket or container under the cluster and lightly tap it. Ripe tomatoes will fall into the bucket.
- Palm Tapping: Tap the bunch of tomatoes gently with your open palm to dislodge ripe ones.
- Two-Handed Twist: Hold the cluster with one hand and use the other to twist the stem.
- Thumb Snap: Press your thumb against the stem until it snaps, leaving the tomato in your hand.
- Clip and Carry: Carry a small pair of scissors or garden shears with you while you inspect your plants. Snip off ripe tomatoes as you find them.
Delicious Recipes and Meal Ideas
Here are some delightful recipes and meal ideas featuring your homegrown cherry tomatoes:
- Caprese Salad: Combine cherry tomatoes with fresh mozzarella, basil leaves, olive oil, and balsamic vinegar.
- Pasta Primavera: Toss cooked pasta with sautéed cherry tomatoes, garlic, and a mix of your favorite vegetables.
- Bruschetta: Top toasted bread with diced cherry tomatoes, garlic, fresh basil, and a drizzle of olive oil.
- Cherry Tomato Galette: Create a rustic tart by filling a pastry crust with sliced cherry tomatoes, cheese, and herbs.
- Tomato Salsa: Whip up a fresh salsa with cherry tomatoes, onions, cilantro, lime juice, and jalapeños for a zesty dip.
- Tomato and Mozzarella Skewers: Thread cherry tomatoes and mozzarella balls onto skewers, drizzle with pesto, and serve as appetizers.
- Stuffed Cherry Tomatoes: Hollow out cherry tomatoes and fill them with a mixture of cream cheese, herbs, and bacon bits.
How Do I Know EXACTLY WHEN to Pick My Cherry Tomatoes?
Troubleshooting Common Issues
Common Problems During the Growing Process
Here are common problems you might encounter while growing cherry tomatoes:
- Yellowing Leaves: Could indicate overwatering, nutrient deficiencies, or pests. Adjust watering and fertilizing accordingly.
- Cracked Tomatoes: Inconsistent watering or rapid growth can cause cracking. Maintain even moisture levels.
- Blossom End Rot: A calcium deficiency due to uneven watering or soil pH imbalance. Maintain consistent moisture and add calcium-rich amendments.
- Leaf Curling: Could be a sign of aphids, diseases, or excessive heat. Inspect for pests and provide shade in extreme heat.
- Wilting Plants: Overwatering or root issues. Adjust watering and improve drainage.
- No Fruits: Lack of pollination or excessive nitrogen. Attract pollinators and adjust fertilizer.
- Yellow Shoulders: Sunburn due to intense sunlight. Provide shade during peak sun hours.
Tips for Preventing Future Issues
- Regular Inspection: Check your plants regularly for signs of pests or diseases.
- Proper Watering: Maintain consistent moisture levels and avoid waterlogged soil.
- Balanced Fertilizing: Follow a balanced fertilizing schedule to avoid over-feeding with nitrogen.
- Good Air Circulation: Ensure proper spacing and pruning for good airflow.
- Mulching: Apply mulch to regulate soil temperature, retain moisture, and reduce weeds.
- Crop Rotation: Avoid planting tomatoes in the same spot every year to reduce disease buildup in the soil.
- Companion Planting: Plant pest-repelling herbs and flowers nearby, like basil and marigolds.
Conclusion
Growing cherry tomatoes in containers isn’t just about gardening; it’s about creating a little slice of paradise right at your doorstep. So, dive in, get your hands dirty, and embrace the joy of nurturing these little tomato treasures. Remember, every cherry tomato you pluck is a piece of your hard work and a burst of garden-fresh flavor. Happy gardening!
Ready to embark on your cherry tomato journey? Check out our list of additional resources below to become a true cherry tomato virtuoso!
- Books: “Container Gardening for Dummies” by Bill Marken
- Websites: TomatoGardening.com – A treasure trove of tomato-growing tips
- Forums: GardenWeb’s Vegetable Gardening Forum – Connect with fellow gardeners for advice
Now go out there and grow those cherry tomatoes like a pro!
You might also read:
FAQs
Question 1: Can cherry tomatoes be grown indoors, and what are the key considerations for successful indoor cultivation?
Answer: Yes, cherry tomatoes can be grown indoors in containers. To succeed, ensure your indoor space receives sufficient sunlight or artificial light, maintain proper ventilation, and choose compact tomato varieties suitable for container growth.
Question 2: How can I enhance the flavor of my homegrown cherry tomatoes?
Answer: Experiment with stress-inducing techniques to enhance flavor. Slight water stress followed by adequate watering, known as “dry farming,” can lead to more concentrated flavors in cherry tomatoes. However, be cautious not to stress the plants excessively.
Question 3: Are there companion plants that can improve cherry tomato growth in containers?
Answer: Basil is a great companion plant for cherry tomatoes. Its aroma can help deter certain pests that might affect tomatoes. Additionally, basil’s compact growth makes it suitable for container planting alongside tomatoes.
Question 4: What’s the concept of “self-pruning” in cherry tomato cultivation, and how can it benefit container growth?
Answer: Cherry tomato plants naturally shed lower leaves as they grow. This process, known as self-pruning, can improve airflow and reduce disease risk. When growing cherry tomatoes in containers, encourage self-pruning by gently removing lower leaves as the plant grows taller.
Question 5: Can you explain the technique of “step-over” pruning for compact cherry tomato varieties?
Answer: “Step-over” pruning involves allowing cherry tomato vines to grow horizontally along the container’s edge. When the vine reaches the container’s edge, gently redirect it to grow along the top of the soil. This technique maximizes fruit-bearing potential and prevents the plant from becoming too leggy.

