
Table of Contents
Growing cherry tomatoes in pots can be a rewarding experience, even if you have limited space or poor soil. Here’s a step-by-step guide to help you successfully cultivate cherry tomatoes in pots
Select the Right Pot to Grow Cherry Tomatoes
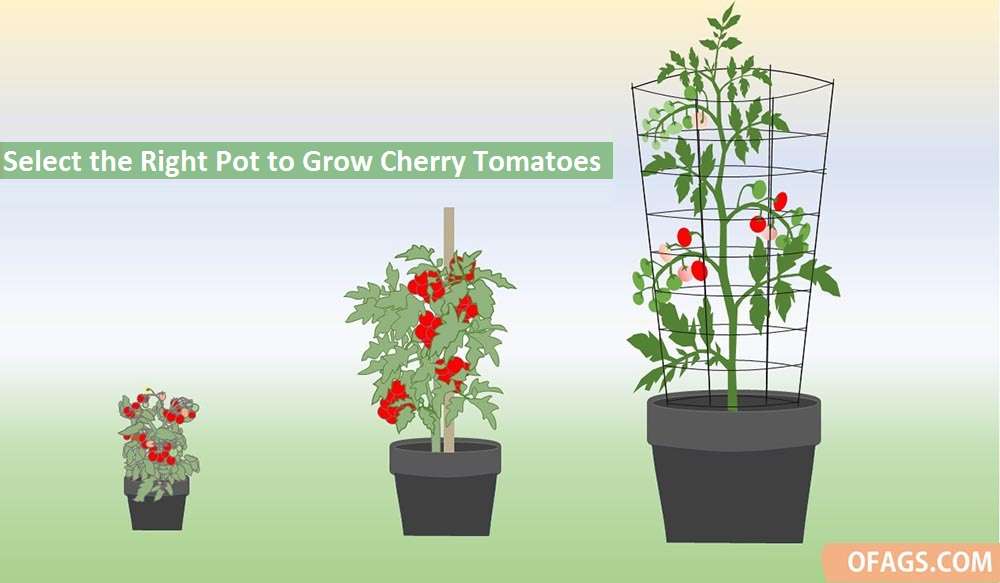
Selecting the right pot is crucial for successfully growing cherry tomatoes in pots. Here are some additional tips and considerations regarding the choice of pots:
Pot Material: Choose containers made of materials such as plastic, ceramic, or fabric. These materials are durable and can retain moisture better than terracotta, which tends to dry out quickly. Plastic pots are often lightweight and easy to move, while fabric pots offer excellent drainage and aeration.
- Drainage: Ensure that the container has adequate drainage holes at the bottom to prevent water from pooling around the roots, which can lead to root rot. You can also add a layer of small stones or broken pottery shards at the bottom to further enhance drainage.
- Pot Size: While a 5-gallon (19-liter) pot is a good starting point, larger containers, such as 10 or 15 gallons (38-57 liters), will provide more room for the cherry tomato’s root system and better moisture retention. Larger containers can also help prevent the soil from overheating on hot days.
- Depth: Select pots that are at least 12 to 18 inches (30-45 cm) deep to accommodate the tomato plant’s root growth. Deeper pots allow for a more extensive root system, which can help support a healthy, productive plant.
- Number of Plants per pot: It’s generally recommended to plant one cherry tomato plant per pot. Planting multiple tomatoes in a single pot can lead to overcrowding and competition for resources.
- Container Mobility: Consider the weight of the pot when filled with soil and water. If you plan to move your pots around to optimize sunlight or protect from adverse weather, ensure the pot is manageable in terms of weight.
- Aesthetic Considerations: Choose containers that complement your garden or patio’s aesthetic. Decorative pots can enhance the overall look of your gardening space.
- Pot Sterilization: If you’re reusing pots from a previous season, clean and sterilize them to prevent the carryover of diseases or pests.
Remember that the pots you choose should provide a stable and healthy environment for your cherry tomato plant. Proper pot selection, along with the other steps mentioned in the initial response, will help you grow robust and productive cherry tomatoes in pots.
Choose the Right Tomato Varieties to grow in pots
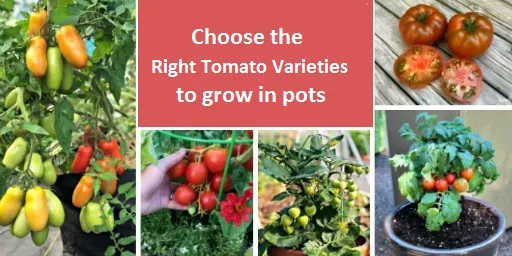
Selecting the right tomato varieties is crucial when growing cherry tomatoes in pots. Determinate or compact cherry tomato varieties are ideal for container gardening because they have a more controlled growth habit and typically produce smaller plants. Here are some popular cherry tomato varieties that work well in pots:
- Tiny Tim: Tiny Tim is an ultra-compact cherry tomato variety that grows to about 12-18 inches (30-45 cm) in height. It’s perfect for small containers and even windowsill gardening. Despite its small size, it produces abundant, sweet cherry tomatoes.
- Tumbling Tom: Tumbling Tom is a trailing cherry tomato variety that is well-suited for hanging baskets or tall containers. It has a cascading growth habit, making it an attractive choice for vertical gardening. There are both red and yellow varieties available.
- Balcony: As the name suggests, Balcony cherry tomatoes are bred specifically for container gardening and small spaces. They produce small, sweet fruits and have a compact growth habit, making them an excellent choice for patio or balcony gardens.
- Patio Princess: Patio Princess is another compact determinate cherry tomato variety. It reaches a height of about 18-24 inches (45-60 cm) and is well-suited for small to medium-sized containers. It produces small, red, flavorful cherry tomatoes.
- Bush Early Girl: While not a traditional cherry tomato, Bush Early Girl is a compact determinate variety that produces small to medium-sized tomatoes. It’s suitable for containers and can be trained to grow more upright.
- Sweet 100: Sweet 100 is a prolific cherry tomato variety that produces clusters of small, sweet, red tomatoes. It has a vigorous growth habit but can be managed in a container with proper support and pruning.
When selecting a cherry tomato variety for your pot garden, consider factors such as the available space, the size of the pot, and your personal preference for tomato flavor (some are sweeter, while others have a more tangy flavor). Additionally, check the plant tags or descriptions for information on the plant’s growth habit and suitability for container gardening. With the right variety, you can enjoy a bountiful harvest of delicious cherry tomatoes in your small-space garden.
Potting mix for pot-grown cherry tomatoes
Choosing the right potting mix is crucial for the success of your pot-grown cherry tomatoes. Here’s more information on selecting and preparing the appropriate potting mix:
- High-Quality Potting Mix: Start with a high-quality potting mix that is specifically formulated for vegetables or tomatoes. These mixes are designed to provide the essential nutrients and pH levels that tomatoes need for healthy growth and fruit production.
- Well-Draining Mix: Ensure that the potting mix you choose is well-draining. Good drainage is essential to prevent waterlogging, which can lead to root rot and other problems. Look for mixes with perlite or vermiculite, which improve aeration and drainage.
- Lightweight Mix: Lightweight mixes are easier to manage, especially if you plan to move your containers around. A lightweight mix also reduces the overall weight of the container, making it more manageable. Peat-based mixes are often lightweight and commonly used in potting soils.
- Rich in Organic Matter: A potting mix rich in organic matter provides essential nutrients to your cherry tomato plants. Organic matter helps improve soil structure, water retention, and nutrient availability. Look for mixes that contain compost, coconut coir, or well-rotted composted materials.
- Nutrient Content: While potting mixes are formulated with nutrients, they may not be sufficient for the entire growing season. You’ll likely need to supplement with a balanced, slow-release tomato fertilizer or a liquid fertilizer as the season progresses. Follow the recommended application rates on the fertilizer packaging.
- Sterilization: If you are reusing containers or potting mix from a previous season, it’s a good practice to sterilize the mix to kill any potential disease pathogens. You can do this by baking the soil in an oven at 180-200°F (82-93°C) for about 30 minutes.
- pH Level: Check the pH level of your potting mix. Tomatoes generally prefer a slightly acidic to neutral pH level (around 6.0 to 6.8). If your potting mix is too acidic or alkaline, you can adjust it with lime (to raise pH) or sulfur (to lower pH) as needed.
- Pot Preparation: Fill your chosen pot with the potting mix, leaving a few inches of space at the top to allow for watering. Pat the mix down gently to remove any air pockets, and water it thoroughly before planting your cherry tomato seedling.
Choosing the right potting mix and ensuring it meets the needs of your cherry tomato plants is a crucial step in container gardening success. A well-balanced, well-draining mix will provide a healthy environment for your plants to thrive and produce a bountiful harvest.
Planting your cherry tomato seedlings
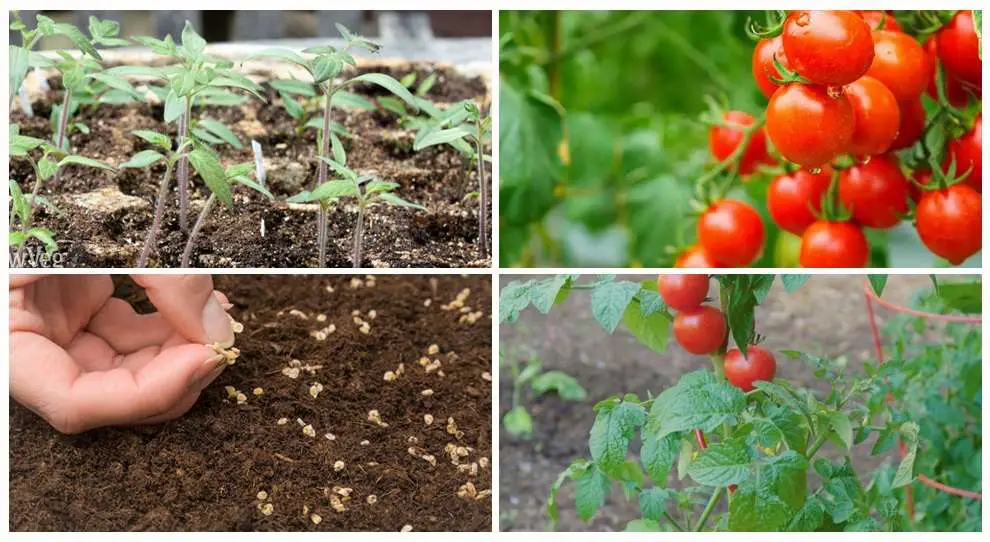
Planting your cherry tomato seedlings correctly is essential for their growth and development. Here’s how to go about it:
Transplanting Seedlings:
- Choose Healthy Seedlings: When selecting seedlings to transplant, pick ones that are healthy, have sturdy stems, and vibrant green leaves. Avoid seedlings with signs of disease or pests.
- Prepare the Container: Fill your chosen container with the prepared potting mix, leaving a few inches of space at the top. Water the mix to ensure it’s evenly moist before planting.
- Dig a Hole: Use your finger or a small trowel to dig a hole in the potting mix. The hole should be deep enough to accommodate the entire root ball of the seedling.
- Transplant at the Same Depth: Gently remove the seedling from its nursery container, being careful not to damage the roots. Place the seedling in the hole in your container, making sure to plant it at the same depth it was in its nursery container. This means the soil level around the stem should be at the same height as it was before.
- Backfill and Tamp: Carefully fill in the hole around the seedling with the potting mix. Gently tamp down the soil to remove any air pockets. Water the container again to settle the soil.
- Label Your Plant: It’s a good idea to label your container with the tomato variety and the planting date. This can help you keep track of your plants and their progress.
Sowing Tomato Seeds:
- Prepare Seed Starting Mix: If you’re starting your cherry tomatoes from seeds, use a seed starting mix rather than potting soil. Seed starting mixes are lighter and better for germination.
- Sow Seeds: Create small furrows or depressions in the seed starting mix, about 1/4 inch deep. Place the tomato seeds in these furrows, spacing them according to the seed packet instructions (usually a few inches apart).
- Cover and Water: Gently cover the seeds with a thin layer of seed starting mix or vermiculite. Water the seeds using a fine mist or a gentle spray to avoid displacing the seeds.
- Provide Light: Place the container with the seeds under a grow light or in a location with bright, indirect sunlight. Maintain a temperature between 70-80°F (21-27°C) for optimal germination.
- Thin Seedlings: Once the seedlings have a few true leaves (the second set of leaves that appear after the initial cotyledon leaves), thin them out. Remove the weaker seedlings, leaving only the strongest and healthiest ones. This ensures that the remaining seedlings have enough space to grow.
Whether you’re transplanting seedlings or starting from seeds, proper planting and spacing are key to ensuring that your cherry tomato plants have the best chance for success. Keep the soil consistently moist and provide the appropriate care as your plants grow to enjoy a productive harvest.
Supporting cherry tomato plants
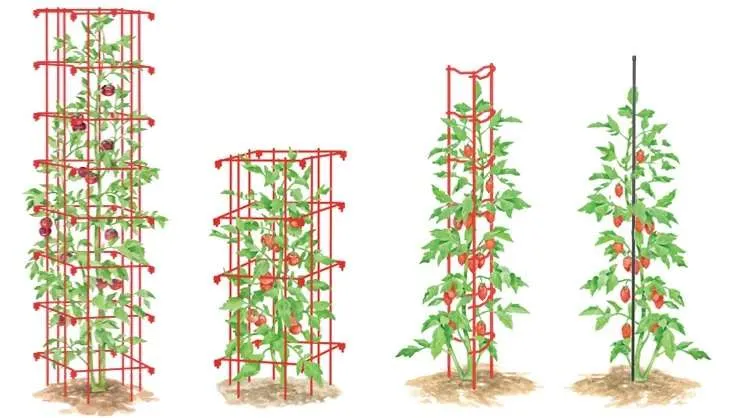
Supporting your cherry tomato plants is essential to prevent them from bending, breaking, or sprawling across the ground as they grow and produce fruit. Here’s how to provide adequate support for your container-grown cherry tomatoes:
- Choose the Right Support: There are several options for supporting cherry tomato plants in containers:
- Stakes: Place a sturdy wooden or metal stake (around 4-6 feet tall) into the container when you transplant the seedling. Drive it into the pot’s center, being careful not to damage the plant’s roots. As the plant grows, gently tie its main stem to the stake using soft plant ties or twine. This method works well for determinate varieties that have a more upright growth habit.
- Tomato Cages: Tomato cages are excellent for supporting indeterminate cherry tomato varieties. Insert the cage into the container at the time of planting or shortly afterward. As the plant grows, guide its branches through the openings in the cage to provide support. Make sure the cage is securely anchored in the pot to prevent it from toppling over as the plant gets larger.
- Trellis or Lattice: In addition to stakes or cages, you can install a trellis or lattice against a wall or fence near your container. Train the tomato plant to grow vertically against the trellis, securing the branches as they grow.
- Tying and Pruning: Regularly check your tomato plants for branches that need support or pruning. Use soft ties or twine to loosely secure the branches to the support structure. This prevents the branches from bending or breaking under the weight of the fruit. As the plant grows, prune any excessive foliage and non-fruit-bearing branches to improve air circulation and reduce the plant’s weight.
- Adjust as Needed: Cherry tomato plants can become quite heavy when laden with fruit, so it’s essential to monitor the support structures throughout the growing season. Adjust ties and make sure stakes or cages remain secure. You may need to add additional ties or supports as the plant continues to grow.
- Harvest Carefully: When harvesting cherry tomatoes, gently pick the ripe fruit to avoid damaging the plant or its branches. If you accidentally break a branch, provide immediate support and trim any damaged parts to prevent disease or pests from entering.
Proper support for your cherry tomato plants not only prevents damage but also encourages better air circulation, reduces the risk of disease, and makes it easier to harvest your delicious cherry tomatoes. By taking these steps, you can help ensure a productive and healthy growing season for your container-grown tomatoes.
Watering guidelines to cherry tomato
Proper watering is crucial for the health and productivity of your pot-grown cherry tomato plants. Follow these watering guidelines to ensure they receive the right amount of moisture:
- Consistent Moisture: Cherry tomatoes prefer consistently moist soil. Aim to keep the soil evenly moist, but avoid overwatering, which can lead to root rot and other issues.
- Check the Top Inch: A good rule of thumb is to check the top inch (approximately 2.5 cm) of soil in your container. When this top layer feels dry to the touch, it’s time to water again. Stick your finger into the soil to assess its moisture level.
- Water Deeply: When you do water, water deeply to encourage the roots to grow deeper into the container. Add water until you see it coming out of the drainage holes at the bottom. This ensures that the entire root zone is adequately hydrated.
- Morning Watering: It’s best to water your cherry tomato plants in the morning. Watering in the morning allows the foliage to dry before evening, reducing the risk of fungal diseases. Avoid watering in the late afternoon or evening when the plant is less likely to dry before nighttime.
- Use a Soaker Hose or Drip Irrigation: Consider using a soaker hose or drip irrigation system for consistent and efficient watering. These systems deliver water directly to the root zone, reducing the risk of wetting the foliage.
- Mulch: Apply a layer of organic mulch, such as straw or wood chips, on the surface of the potting mix. Mulch helps retain soil moisture, reduces evaporation, and prevents weeds from competing with your cherry tomato plants for water.
- Avoid Overhead Watering: As mentioned earlier, avoid wetting the foliage when watering. Wet leaves can increase the likelihood of fungal diseases. Water the soil around the base of the plant instead.
- Adjust for Weather: Be mindful of weather conditions. During hot, dry spells, you may need to water more frequently. Conversely, reduce watering during cool or rainy periods to prevent waterlogged soil.
- Use a Moisture Meter: Consider using a moisture meter, available at garden supply stores, to accurately assess the soil’s moisture level. This can help you determine when it’s time to water without relying solely on touch.
- Consistency is Key: Maintain a consistent watering schedule to prevent stress on the plants. Irregular watering can lead to issues like blossom end rot or fruit cracking.
Remember that the specific watering needs of your cherry tomato plants may vary depending on factors like temperature, humidity, and the size of your container. Regular monitoring and adjustment of your watering routine will help keep your cherry tomatoes healthy and thriving.
Fertilizing Your Cherry Tomatoes
Fertilizing your pot-grown cherry tomatoes is essential to provide them with the necessary nutrients for healthy growth and bountiful fruit production. Here’s how to go about it:
- Choose the Right Fertilizer: Select a balanced, slow-release fertilizer or a liquid fertilizer specifically formulated for tomatoes. These fertilizers contain the essential nutrients that tomatoes need, including nitrogen (N), phosphorus (P), and potassium (K), as well as micronutrients.
- Initial Fertilization: When transplanting your cherry tomato seedlings into the containers, incorporate a slow-release granular fertilizer into the potting mix according to the package instructions. This provides a steady supply of nutrients over time.
- Liquid Fertilizer: In addition to the initial slow-release fertilizer, you’ll likely need to supplement with a liquid fertilizer as the growing season progresses. Liquid fertilizers are absorbed more quickly by the plant and can address any nutrient deficiencies that may arise.
- Frequency of Fertilization: The frequency of fertilization can vary depending on the type of fertilizer and the stage of plant growth. In general, for liquid fertilizers, plan to fertilize your cherry tomatoes every two to four weeks. Slow-release fertilizers may last longer, but it’s still a good idea to monitor plant growth and leaf color to determine if additional fertilizer is needed.
- Dilute Liquid Fertilizer: When using liquid fertilizer, dilute it to half the recommended strength to reduce the risk of over-fertilization. Apply the diluted fertilizer to the soil around the base of the plant, avoiding contact with the foliage.
- Avoid Over-Fertilization: Over-fertilization can lead to problems such as excessive foliage growth at the expense of fruit production or nutrient imbalances. Stick to the recommended rates and avoid applying more fertilizer than necessary.
- Water After Fertilizing: After applying liquid fertilizer, water the container thoroughly. This helps distribute the nutrients evenly and prevents potential root burn.
- Monitor Plant Health: Keep an eye on the health of your cherry tomato plants. If you notice any signs of nutrient deficiencies, such as yellowing leaves or poor fruit development, adjust your fertilization schedule accordingly.
- End-of-Season Fertilization: Toward the end of the growing season, you can reduce or stop fertilizing to allow the plants to naturally mature and ripen their remaining fruit.
Proper fertilization, combined with adequate watering and other care practices, will help ensure that your container-grown cherry tomatoes receive the nutrients they need to thrive and produce a tasty harvest.
Sunlight Needed for Cherry Tomatoes
Sunlight is one of the most critical factors for the successful growth of cherry tomatoes. Here’s how to ensure your container-grown cherry tomato plants receive the right amount of sunlight:
- Sunlight Requirements: Cherry tomato plants thrive in full sun, which means they need at least 6-8 hours of direct sunlight each day. Inadequate sunlight can result in leggy, weak plants and reduced fruit production.
- Choose the Right Location: Select a sunny location for your containers. Ideally, this should be a spot that receives the maximum amount of sunlight throughout the day. South or southwest-facing areas often provide the best sunlight exposure.
- Observe Sun Patterns: Spend some time observing how sunlight moves across your outdoor space. This will help you determine the sunniest spots for your containers. Keep in mind that the sun’s angle changes with the seasons, so consider this when deciding on your planting location.
- Use Reflective Surfaces: If you have limited space or sunlight, consider placing reflective surfaces near your containers, such as white walls or reflective materials. These surfaces can bounce additional light onto your plants.
- Container Mobility: If possible, move your containers to track the sun’s path throughout the day. This can be especially helpful in areas with limited sunlight.
- Supplement with Grow Lights: In situations where natural sunlight is insufficient, such as during the winter or in locations with heavy shade, you can supplement with grow lights. LED or fluorescent grow lights are suitable options for providing the necessary light spectrum for plant growth. Place the grow lights above your containers and adjust their height to maintain the recommended light intensity.
- Rotate the Containers: Periodically rotate your containers to ensure all sides of the plant receive adequate light. This helps prevent one side of the plant from becoming excessively shaded.
- Watch for Signs of Sun Stress: Monitor your cherry tomato plants for signs of sun stress. If leaves become pale or yellow and appear scorched, they may be getting too much direct sunlight. Provide some shade during the hottest part of the day in such cases.
- Protect from Strong Winds: While sunlight is crucial, strong winds can damage cherry tomato plants. Consider placing your containers in a location that offers some wind protection, such as near a fence or wall.
By providing your container-grown cherry tomatoes with the right amount of sunlight, you’ll help them grow vigorously, produce plenty of flowers and fruit, and ultimately enjoy a successful and productive gardening experience.
Pruning cherry tomato plants
Pruning cherry tomato plants, especially indeterminate varieties, is an essential practice that can lead to healthier plants and increased fruit production. Here’s how to properly prune your container-grown cherry tomatoes:
- Understand the Types of Tomatoes:
- Determinate Varieties: These tomato plants have a more compact growth habit and a predetermined maximum height. They typically require less pruning.
- Indeterminate Varieties: These plants are more vining and can continue to grow and produce fruit throughout the season. Pruning is especially important for indeterminate cherry tomato varieties to manage their size and productivity.
- Identify Suckers:
- Suckers are small shoots that develop in the leaf axils, which are the points where the leaf stem attaches to the main stem.
- They usually emerge as new growth between the main stem and a leaf branch.
- When to Prune:
- Begin pruning when your cherry tomato plant has reached a manageable height or when the first suckers start to develop. This is typically a few weeks after transplanting.
- Continue to prune regularly throughout the growing season to maintain the desired shape and manage the plant’s size.
- Pruning Technique:
- Use clean, sharp pruning shears or scissors to pinch or cut off the suckers. Make the cut as close to the main stem as possible to avoid leaving a stub.
- Be gentle when pinching or cutting to avoid damaging the main stem or other branches.
- Which Suckers to Remove:
- Focus on removing the lower suckers first, as they are often the most vigorous.
- Remove any suckers that are growing below the first set of flowers or fruit clusters.
- As the plant grows, remove additional suckers that may crowd the plant or reduce air circulation.
- Prune for Air Circulation:
- Pruning not only controls plant size but also improves air circulation around the plant. This reduces the risk of fungal diseases like blight.
- Remove any yellowing or diseased leaves as well, as they can be a source of infection.
- Maintain a Single Leader Stem (Optional):
- Some gardeners choose to prune indeterminate cherry tomato plants to have a single leader stem. This involves removing all side shoots and suckers except for one main stem.
- This method can lead to a more orderly plant but may reduce overall fruit production. It’s a matter of personal preference.
- Support After Pruning:
- After pruning, make sure to check and adjust any support structures, such as stakes or cages, as the plant’s shape and size may have changed.
Pruning cherry tomato plants can help manage their growth, improve fruit quality, and reduce the risk of disease. It’s essential to balance pruning with the need for fruit production, so avoid excessive pruning that could limit your harvest. Regularly monitor your plants and adjust your pruning technique as needed throughout the growing season.
Pests and Diseases Control
Managing pests and diseases is crucial to the success of your cherry tomato container garden. Here are some more detailed tips for pest and disease management:
Pest Management:
- Aphids: These tiny insects can cluster on the undersides of leaves and suck the sap from your tomato plants, causing curling leaves and stunted growth. To control aphids:
- Spray a mixture of water and a few drops of dish soap on the affected areas, taking care not to damage the plant. This soapy water suffocates and repels aphids.
- Introduce natural predators like ladybugs or lacewings, which feed on aphids.
- Hornworms: Hornworms are large green caterpillars that can quickly defoliate your plants. To manage them:
- Inspect your plants regularly, especially the undersides of leaves.
- Handpick hornworms and drop them into a bucket of soapy water or relocate them away from your garden.
- Attract parasitoid wasps by planting flowers like marigolds and dill nearby, as they lay eggs on hornworms, which can help control their populations.
- Whiteflies: These tiny, white, moth-like insects can damage your plants by feeding on their sap and transmitting diseases. To control whiteflies:
- Use yellow sticky traps to catch adult whiteflies.
- Spray a mixture of water and insecticidal soap on the undersides of leaves.
- Encourage natural predators like ladybugs and parasitic wasps.
Disease Management:
- Blight: Blight is a common fungal disease that affects tomato plants, causing dark spots on leaves and fruit. To manage blight:
- Practice good sanitation by removing and disposing of any affected leaves or fruit.
- Avoid overhead watering to prevent moisture on the foliage.
- Apply copper-based fungicides as a preventive measure early in the growing season or when conditions are favorable for blight development.
- Use disease-resistant tomato varieties if blight is a recurring problem in your area.
- Early Blight: This fungal disease causes circular, dark spots on lower leaves and can lead to defoliation. To manage early blight:
- Remove affected leaves as soon as you notice symptoms.
- Apply a copper-based fungicide or a fungicide specifically labeled for early blight.
- Properly space your plants to improve air circulation and reduce humidity around the leaves.
- Late Blight: Late blight is a more severe fungal disease that can devastate tomato plants quickly. To manage late blight:
- Remove and destroy infected plants immediately to prevent the spread of the disease.
- Avoid overhead watering and ensure good air circulation.
- Apply copper-based fungicides preventively if late blight is a known problem in your area.
Regularly inspecting your cherry tomato plants, practicing good sanitation, and using organic pest control methods will help you keep pests and diseases under control and ensure a healthy and productive harvest.
Harvesting cherry tomatoes
Harvesting cherry tomatoes at the right time is essential to enjoy their full flavor and encourage continuous fruit production. Here’s how to know when to harvest your cherry tomatoes:
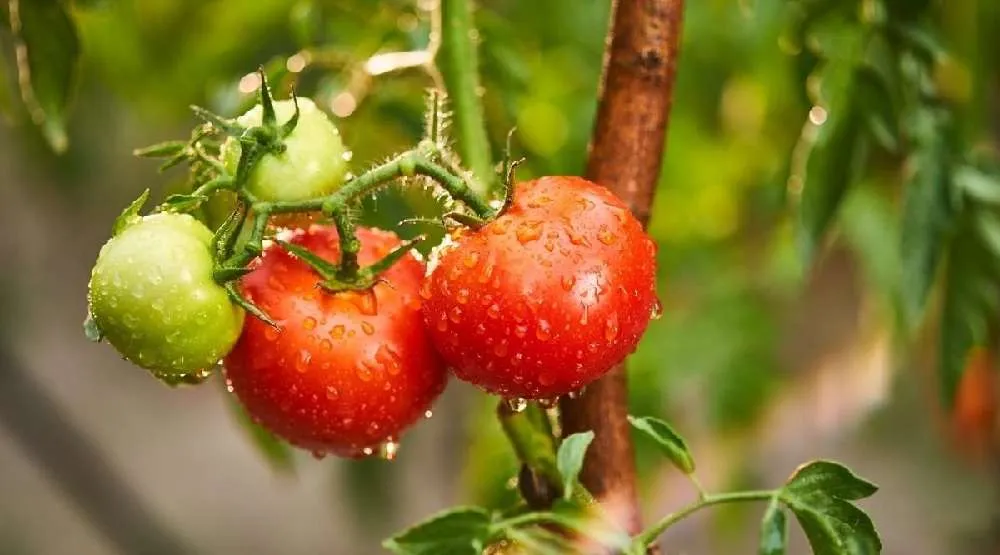
- Color: Cherry tomatoes are ready to harvest when they reach their full, vibrant color. Depending on the variety, this can be red, orange, yellow, or even purple. The exact color will vary based on the specific cultivar you are growing.
- Texture: Gently squeeze the tomato between your thumb and forefinger. A ripe cherry tomato should have a slight give or softness when you apply gentle pressure. It shouldn’t be rock-hard but also not overly mushy.
- Glossy Appearance: Ripe cherry tomatoes typically have a shiny or glossy appearance compared to unripe ones. The skin should be smooth and free of wrinkles or blemishes.
- Easy to Detach: When you gently twist a ripe cherry tomato, it should easily detach from the stem without requiring much effort. If the fruit is stubborn and doesn’t come off easily, it may not be fully ripe.
Fully Matured on the Vine: Whenever possible, let your cherry tomatoes fully mature on the vine. This allows them to develop their full flavor and sweetness.
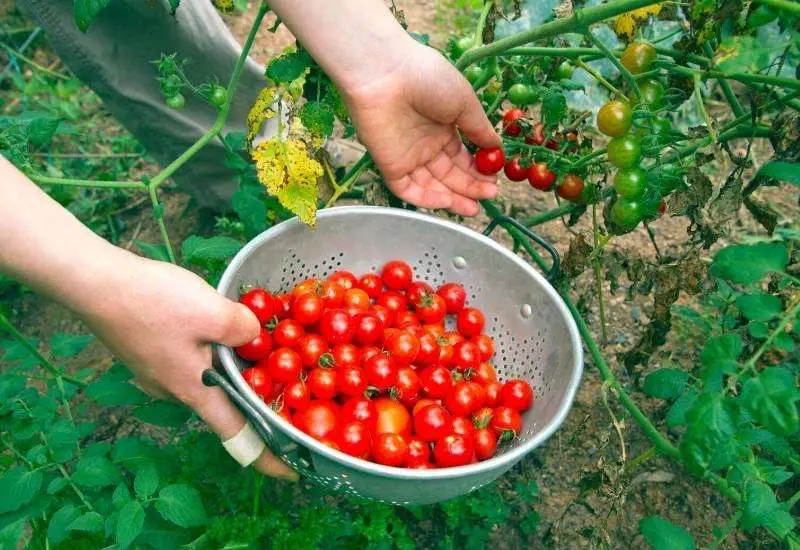
- Frequent Harvesting: Cherry tomato plants are prolific producers, so it’s essential to harvest regularly. Check your plants every couple of days during the peak of the growing season to collect ripe fruit. Regular harvesting also encourages the plant to continue producing more tomatoes.
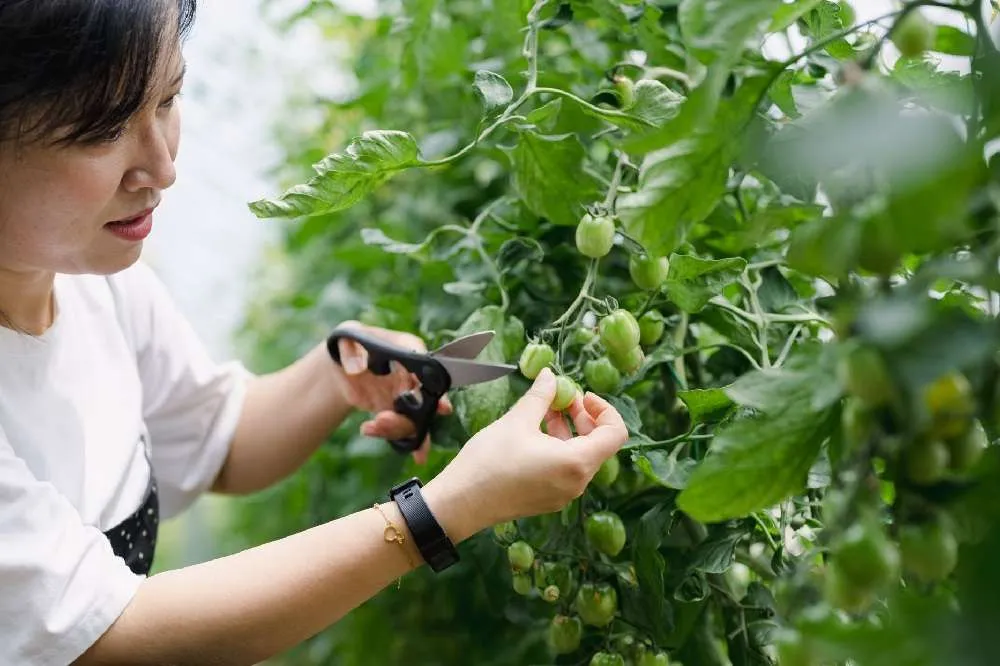
- Use Pruning Shears or Scissors: To avoid damaging the plant, use clean pruning shears or scissors to cut the tomato from the stem instead of pulling or twisting it off.
- Inspect and Remove Overripe Fruit: Keep an eye out for overripe or rotting fruit on the plant. Promptly remove any overripe tomatoes, as they can attract pests or diseases and affect the overall health of the plant.
- Harvest in the Morning: The morning is an ideal time to harvest cherry tomatoes when temperatures are cooler, and the fruit is at its freshest.
- Store Properly: After harvesting, store your cherry tomatoes in a cool, dry place or in the refrigerator to prolong their shelf life. However, tomatoes are best enjoyed at room temperature for the fullest flavor, so consider allowing them to warm up before consuming.
Harvesting cherry tomatoes at their peak of ripeness ensures the best taste and quality. Whether you enjoy them fresh in salads, as a snack, or in various recipes, you’ll appreciate the full flavor and sweetness of properly harvested cherry tomatoes.
Overwintering cherry tomato plants
Overwintering your cherry tomato plants in regions with frosty winters can be a rewarding endeavor, as it allows you to continue harvesting fresh tomatoes even when the outdoor growing season has ended. Here’s how to overwinter your cherry tomato plants successfully:
- Timing: Plan to bring your cherry tomato pots indoors or provide frost protection when frost is imminent, typically in late fall as temperatures start to drop.
- Select Healthy Plants: Choose the healthiest and most productive cherry tomato plants for overwintering. Avoid plants that show signs of disease or stress.
- Pot Selection: Ensure that the pots you’ll be overwintering your tomatoes in are of an appropriate size and in good condition. It’s best to use containers that are slightly larger than the current root system to allow for some growth during the winter months.
- Indoor Location: Find a suitable indoor location to overwinter your cherry tomato pots. A bright, south-facing window or a space with access to grow lights is ideal. Tomatoes require at least 6-8 hours of direct sunlight daily for adequate growth.
- Pruning: Before bringing the plants indoors, give them a thorough pruning. Remove any damaged or diseased leaves, as well as any excess foliage to promote better air circulation. You can trim the plants back quite aggressively, leaving only a few healthy leaves and stems.
- Pest Inspection: Check your plants carefully for pests before bringing them indoors. Treat any infestations with organic pest control methods or insecticidal soap.
- Repot if Necessary: If your cherry tomato plants have outgrown their pots or if the soil has become depleted, consider repotting them into fresh potting mix before bringing them indoors.
- Frost Blankets: If you prefer not to bring the plants indoors, you can provide frost protection with frost blankets or row covers. Be sure to secure them properly to prevent cold air from getting underneath.
- Watering: Adjust your watering routine for the indoor environment. Indoor plants typically require less water than outdoor ones. Water thoroughly but allow the top inch or so of soil to dry out between watering.
- Temperature: Cherry tomatoes are sensitive to low temperatures, so keep your indoor environment consistently warm. Aim for daytime temperatures of around 70-75°F (21-24°C) and nighttime temperatures above 55°F (13°C).
- Supports: Provide adequate support for your indoor cherry tomato plants, especially if they continue to produce fruit. You may need to stake or cage them to prevent sprawling.
- Fertilization: Continue to fertilize your overwintering cherry tomato plants, but reduce the frequency compared to the outdoor growing season. Use a balanced, diluted liquid fertilizer every 4-6 weeks.
- Pollination: Indoors, pollination may be an issue as natural pollinators are absent. You can gently shake the plants to help with pollination or use a small brush to transfer pollen from flower to flower.
By following these steps and providing the right environment and care, you can successfully overwinter your cherry tomato plants, ensuring a longer and more extended harvest even in frosty winter regions.
Replanting or refreshing the soil for Pot Gardening
Replanting or refreshing the soil in your containers after a growing season is a beneficial practice for maintaining the health and productivity of your cherry tomato plants. Here’s how to go about it:
1. Replanting:
a. Complete Soil Replacement:
- Empty the container completely, removing the old potting mix and any remaining root debris from the previous season’s plants.
- Clean the container thoroughly to remove any disease pathogens or pests.
- Check for any damaged or compromised roots on your cherry tomato plants. Trim away any unhealthy portions.
- Refill the container with fresh, high-quality potting mix formulated for vegetables or tomatoes. Ensure the mix is well-draining, nutrient-rich, and lightweight.
- Plant new cherry tomato seedlings or transplant new plants into the fresh potting mix. Follow the planting guidelines mentioned earlier in this conversation.
b. Crop Rotation:
- If you’re growing tomatoes in containers for multiple seasons, consider rotating your crops. Avoid planting tomatoes in the same container for consecutive years to reduce the risk of soilborne diseases and nutrient depletion.
- Plant a different vegetable or herb in the container for a season before returning to tomatoes.
2. Soil Refreshing:
If you prefer not to completely replace the soil, you can refresh it to rejuvenate its nutrient content and structure.
a. Top-Dressing with Compost:
- Remove the top few inches of the old potting mix, and set it aside for disposal or use in other gardening projects.
- Add a layer of well-rotted compost or composted organic matter (about 2-3 inches deep) to the container’s surface.
- Gently mix the compost into the top layer of the remaining potting mix.
b. Fertilization:
- Apply a balanced, slow-release fertilizer or a tomato-specific fertilizer to the surface of the potting mix according to the package instructions. This will replenish nutrients that may have been used up during the previous growing season.
c. Soil Testing:
- Consider conducting a soil test to assess nutrient levels and pH. This can help you make precise adjustments to your soil’s nutrient content and acidity if needed.
d. Crop Rotation:
- If you’re using the same container for multiple seasons, practice crop rotation by choosing a different location for planting your cherry tomato container the following season.
Refreshing the soil in your containers ensures that your cherry tomato plants have access to the nutrients they need for healthy growth and fruit production. It also helps prevent soilborne diseases and maintains good soil structure. Whether you choose to completely replant or refresh the soil, these practices contribute to the long-term success of your container gardening efforts.
My Tips for Growing Cherry Tomatoes
Growing cherry tomatoes in pots is a great way to enjoy fresh, homegrown tomatoes even in limited space. With proper care, you can have a bountiful harvest of delicious cherry tomatoes.
FAQs about growing cherry tomatoes in pots
1. Can I grow cherry tomatoes in a small pot or container?
- While it’s possible to grow cherry tomatoes in smaller pots, it’s not ideal. Cherry tomato plants can become quite large, so it’s best to use containers with a minimum capacity of 5 gallons (19 liters) to provide enough space for healthy growth.
2. Do cherry tomato plants need to be pruned if they’re in a container?
- Yes, cherry tomato plants benefit from pruning, especially indeterminate varieties. Pruning helps manage their size, improve air circulation, and encourage fruit production. Remove suckers and any excessive foliage regularly.
3. Can I use regular garden soil for my cherry tomato pots?
- It’s not recommended to use regular garden soil in containers. Instead, use a high-quality potting mix specifically formulated for vegetables or tomatoes. These mixes are well-draining and lightweight, which is essential for container gardening success.
4. How often should I fertilize my cherry tomato plants in pots?
- The frequency of fertilization depends on the type of fertilizer you use. Generally, apply a balanced, slow-release fertilizer or liquid tomato fertilizer every 2-4 weeks during the growing season. Adjust based on the specific fertilizer’s instructions and the condition of your plants.
5. Can I save seeds from my cherry tomatoes for the next season?
- Yes, you can save seeds from your cherry tomatoes. To do so, choose a ripe tomato, scoop out the seeds, and rinse them clean. Allow the seeds to dry on a paper towel for a few days. Store them in a cool, dry place until the next planting season. Keep in mind that if you’re growing hybrid cherry tomato varieties, the saved seeds may not produce the same characteristics as the parent plant.
You might also read:
